MANGANMEDIA
Media curriculum and student gallery

-
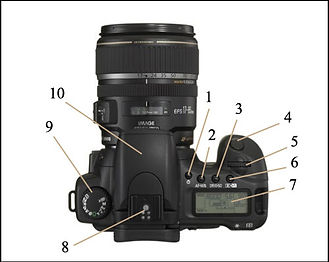
The DSLR Camera
A typical Digital SLR would look like the following image.
Digital SLR – Front
…Let’s look at each individual section of a digital SLR in more detail
1 Lens Alignment – Each lens you use will have a similar red dot. It allows you to align, twist and click the lens in place more easily.
2. Flash Pop Up Button – Press this to activate the pop up flash. There will be similar buttons on all makes of camera. It is a kind of manual over-ride, useful for fill-in flash etc. If in full auto mode, the camera will decide whether or not to use the flash.
-
Lens Release – By pressing this in, you allow the lens to be twisted and released. Note : Try to change lenses out of dusty areas and try to have the camera switched off. The static produced when the camera is on will attract dust to the sensor.
-
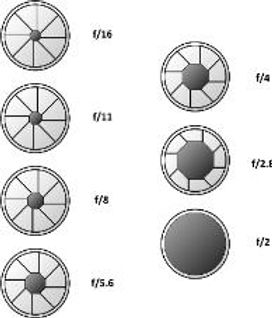
Depth of Field preview – The depth of field determines how much of an image is in focus. For example, if you took a photo of someone with a mountain range in the background, and both the subject and the mountain range are in focus, you have deep or large depth of field. If the subject is in focus but the mountains are blurred, you have shallow or small depth of field. E.g. F16 gives deep depth of field and F2.8 gives shallow depth of field. This button will close the aperture to give you and idea (through the viewfinder) of what will be in focus.
-
Lens contacts – These line up with the contacts of any compatible lenses, allowing the cameras auto focus and other settings to work in time with your lens’s settings.
-
Mirror – This mirror allows you to see, through the viewfinder, almost exactly what you will photograph by reflecting the image up, and into the eyepiece. It flips up the instant that you press the shutter release and returns once the picture is taken. Never touch the mirror with your fingers and use special cleaning equipment and solutions. Some mirrors can be replaced but it is costly. Any dust on the mirror will not appear in your photographs, so if in doubt, leave it alone.
-
Grip – Grip that is usually rubberised for more effective handling of the (sometimes cumbersome) digital SLR cameras.
-
Shutter Release Button – Without wanting to state the obvious, this takes the picture at whatever settings you have made. A half press will start the auto focus and exposure calculations.
-
Focus Assist Beam – Most modern Digital SLR ‘s have this now. It illuminates the subject in poor light to assist the auto focus. It will sometimes be used as an indicator for the self timer function (I.e. it will flash and beep during delay).
-
Pop Up Flash – Semi-professional or Prosumer DSLR ‘s have a built in flash which, when on full auto, will pop up and fire when required. On the manual settings, you will normally have to activate it via a button (see No. 2) for more creative photography.
So that is the front of the camera…the back looks at first glance, to be more complicated
Digital SLR – Back
-
Viewfinder – This is where it all happens. With most film or Digital SLR ‘s, you see about 95-98% of what you shoot. In here you will see the focussing ring at the centre of the image plus most of the other information such as shutter speeds, aperture settings etc.
-
Diopter Adjustment – Very handy if you are slightly long or short sighted. As in binoculars, you can adjust the viewfinder to match the difference in your eyes, enabling you to use the camera without your glasses or contact lenses.
-
Rubber Eye-cup – This can be removed but is handy for 2 reasons. If you wear glasses, it will protect the lenses from scratching against the camera. Without glasses, it helps the viewfinder to mould around your eye and eliminate any surrounding glare.
-
Joystick Dial – On the Canon EOS 20D, this will allow you to move around a menu or image in display mode.
-
Exposure Lock/Zoom Button – On the Canon EOS 20D, this button serves 2 purposes. Firstly it is the Exposure Lock button. If you aim the camera at a scene and press this, it will record and keep (for a few seconds) that exact exposure whilst you re-compose and shoot. Good for if you are shooting into light and want control over the exposure. Doesn’t work in the manual setting. Secondly, when using the image preview screen to look at your exposed images, using this button will zoom in on a specific area.
-
Focus Point Selector/Zoom Button – Again, on the Canon EOS 20D, this has 2 functions. Firstly, it is the Auto focus point selector. You can choose from a number of points as to which you would like to use. If you select all of them, the camera will pick the best point for individual circumstances, automatically. Secondly, when reviewing your images on the screen, this will zoom out of a specific area.
-
Write Indication Light – This will vary in its position depending on the camera you are using. When it flashes red, it is writing data from the recently exposed images, to the CF card or other media. If you open the media door whilst it is flashing, you normally lose the images, much like opening the back of a film camera before rewinding the film.
-
Jog Dial and Set button – The jog dial will scroll through images or items in a menu, and the set button will select an image or setting in the menu.
-
On/Off Button – Switches the camera power on and off. On the 20D Digital SLR, it also activates/deactivates the jog dial. I normally leave the camera on at all times. The sleep mode kicks in after a few minutes and you can turn the power on quickly and instantly by pressing the shutter button.
-
Erase Button – Again, its position will vary according to your camera, but this will erase any selected images. You are normally asked first “are you sure” as a safeguard.
-
Play Button – When the camera is switched on, this will display the last image taken on the small screen. Then you can scroll through all the others.
-
Jump Button – Used to jump 2 or 3 images or menu items at a time. I rarely use this but is good if you are in a hurry.
-
Info – By pressing this, you will bring up all the information of any image that you select and view. It will tell you the exposure settings, white balance, date/time, image size, flash details in fact everything about the photo except the name of the subject! The 20D will also highlight any part of the image that is overexposed and burnt out.
-
Menu Button – This will bring up all the internal menu functions on the screen. You scroll through them using the dial and select buttons. See your camera manual for more details of what your camera can do from here.
-
Screen – Displays menus and images that have been exposed. It will not display the image (in real time) that you are looking at like most digital compact “point and shoots”
-
.
And now the top of the digital SLR camera…we are getting there! If you are confused at this point, take a break, re-read the previous section and have a play with your camera, assuming you have one already. Then come back here to continue
Digital SLR – Top
These buttons will vary from camera to camera, but the symbols are normally the same, and most Digital SLR ‘s have the same functions;
-
Light for LCD Display – Turns on the light to illuminate the LCD panel in low light conditions.
-
AF/WB – Auto focus/white balance setting. Pressing this brings up the choices for white balance (i.e. AUTO/daylight/sun/shadow/tungsten etc), and auto focus (i.e. One shot or Servo etc). One shot means that the camera will focus once and take the image, focussed on that point regardless of how much you or the subject moves. Servo means the cameras focussing system will automatically keep tracking and re-focussing on the subject until you press the shutter. Great for sports/action shots!
-
Drive/ISO – Drive means auto drive or frame rate. You can take a single shot or have the camera on continuous mode which means it will keep firing at 3, 5 or 8 frames per second etc., (depending on your camera), until you remove your finger or the buffer (memory) is full. ISO is the film or sensor sensitivity. 100 ISO is standard sensitivity and will produce fine grain, clear images. 1600 or 3200 ISO on the film or sensor is highly sensitive, meaning you can shoot well in low light conditions without a flash, although you lose a bit in the quality and images will appear more grainy.
-
Shutter Button – (See No. 8 on the first section).
-
Top Dial – This is also used to change/alter various settings in either menu by scrolling up or down. Normally used to change shutter speeds or aperture settings
-
Metering/Flash Compensation – The cameras metering system is in the screen that you see through the viewfinder when lining up a shot. It will measure the light settings of the scene and set the cameras shutter/aperture accordingly or at least let you know what you need to do to expose the image correctly. You can change from full, partial or spot metering, which means the camera will expose to the whole scene, a part of the scene (normally centre weighted) or a single point (spot). The flash compensation button will allow you to fool the camera into thinking that it needs more or less light from your flashgun or speedlite in order to expose the image correctly. It also allows you more creativity as you play with the settings. If a scene appears underexposed when you have used the flashgun, try increasing the flash compensation by a couple of stops.
-
LCD Screen – This will display all the exposure, speed ISO etc., settings that you currently have set. As you adjust or alter them, it will show on this screen. It also tells you how many photos you have left to take, and the remaining battery power.
-
Hotshoe – The area where you can place an external, dedicated speedlite or flashgun. Dedicated means that it is compatible with your camera and will adjust itself as you change the camera settings or zoom on the lens.
-
Exposure control Dial – Using this dial, you can be as creative or lazy as you wish, from full auto mode (like a point and shoot) to fully manual. It will normally include easy automatic settings for various modes such as sports, close up, landscape, night and portraits and will also allow you to control the built in flash and depth of field settings. If you are unsure, and a total newcomer to film or digital SLR photography, set it to “P” or (program) mode. This is fully automatic and will help you while you learn all about the camera and what it can do. Other functions are;
-
Av – Aperture Priority – Which allows you to set the aperture of the lens (i.e. F2.8 or F8) and the camera will select the correct shutter speed. This is good if you want more control over the depth of field (DOF) of your images. Remember F2.8 will have little DOF and F16 will have a lot, or much in focus.
Tv – Shutter Priority – This is the opposite. You set the shutter speed, and the camera will select the correct aperture. Great for sports or wildlife photography where you need control of the shutter speeds. 15th or 30th/sec is slow and 500th/sec is fast. Most digital SLR cameras have a range from 30 second exposure to about 8000th of a second.
Manual – You are in full control here. The cameras metering system will guide you but you need to set the shutter speed and aperture manually. Good for more creative control.
-
Pop up Flash – (See no. 10 in the first section)
-
Lastly the underside of your camera;
Digital SLR – Base
-
Battery compartment – This is where the re-chargeable batteries live. It is normally best to have one or two spares even though the batteries last longer and longer these days. Most new Digital SLR ‘s will have the ability to affix a battery grip which will give you even more power, and give the camera a bulkier feel and therefore easier to grip (if you have big hands).
-
Tripod Socket – Allows you to attach the camera to most makes of tripod. The socket is normally placed to the exact centre of where the lens is for effective balance and weight distribution.
-
Overview: Digital cameras produce pictures by "capturing" or recording thecharacteristics of the light from a scene or subject.The main parts of the camera that are involved in the process are the camerabody, the camera shutter, the camera lens, the lens aperture, and the camera'simage sensor. The camera's LCD screen is for previewing and then viewing thecaptured image.The camera body is a light proof box and the controls for exposure settings andother effects are located on the camera body. The camera shutter and the imagesensor are located inside the camera body.When the camera's shutter release button is pressed, the camera shutter opens and any light coming into the camera lens is directed through the lens aperture and the open shutter to the camera's image sensor.
-
The amount of light that reaches the image sensor is determined by size of the camera lens aperture opening that has been set. The amount of time the light is exposed to the image sensor is determined by which shutter speed is being used.
-
When you take a picture, the colors and characteristics of the light that the image sensor is exposed to is recorded by the image sensor and then saved to the camera's memory card. (all objects reflect light and colors to varying degrees. That reflected light is actually what your pictures or images are made of)The light that is captured by the camera's image sensor and saved to the memory card can then be reproduced on your camera's LCD screen, on a computer screen, or as a print on photo paper. Next, some of the parts of a camera and their functions are explained individually.The Camera Lens: The purpose of the camera lens is to focus and direct theincoming light. The camera lens consists of one or more precisely shaped piecesof glass or plastic called elements. The light coming through the elements is "bent"or directed to the image sensor where the information about the light is captured.The camera lens is an extremely important part of the camera. That is because thetype of lens and the quality of the lens being used will contribute greatly to thesharpness and overall appearance of the picture.There are various types of camera lenses available. The most common types of lenses are Wide Angle, Standard, Telephoto, and Zoom lenses. Please refer to the Prime Lenses tutorial or the Zoom Lenses tutorial to learn the different uses and functions for each of these types of camera lenses.
-
The Camera Lens Aperture: The lens aperture is actually a part of the camera lens. The camera lens aperture controls the amount of light that willreach the camera's image sensor. (as opposed to the camera shutter whichcontrols the length of time light is exposed to the image sensor)The lens aperture has different size openings which are referred to asf-stops. Take a look at the aperture chart on the right for some examples.A large aperture opening would be an aperture setting such as F2.8 orF4 while a small openinwould be set at F16 or F11. The apertureopening size also helps to determine how much certain areas of the imagewill be in focus or out of focus. (that is called Depth of Field)
-
.