
MANGANMEDIA
Media curriculum and student gallery


The Camera Lens: The purpose of the camera lens is to focus and direct theincoming light. The camera lens consists of one or more precisely shaped pieces of glass or plastic called elements. The light coming through the elements is "bent" or directed to the film where the information about the light is captured. The camera lens is an extremely important part of the camera. That is because thetype of lens and the quality of the lens being used will contribute greatly to thesharpness and overall appearance of the picture. There are various types of camera lenses available. The most common types of lenses are Wide Angle, Standard, Telephoto, and Zoom lenses. Please refer to the Prime Lenses tutorial or the Zoom Lenses tutorial to learn the different uses and functions for each of these types of camera lenses
SHUTTER SPEED
The shutter on a camera is like a blind that is situated between the lens and the film. The shutter opens and doses to allow light to enter the camera and reach the film. The shutter speed is the amount of time that the shutter remains open. This time is normally indicated as a fraction of a second and can vary from as fast as 5000 of a second to as slow as half a second or even a second (see figure 1.3A). Some cameras also have a choice of 'B' on the shutter speed dial. This allows the shutter to remain open for as long as the shutter release is pressed.
The shutter speed on most SLR cameras needs to be adjusted to suit a variety of lighting conditions and to capture different kinds of movement shots. The length of time the shutter remains open has a direct bearing on the amount of light that reaches the film. If the shutter remains open for too long, then too much light will reach the film. If the shutter is not open for long enough, insufficient light will reach the film.
To set the shutter speed manually use either S mode or M mode
What shutter speed to use
A standard shutter speed to use is 1/125 of a second. These speeds are appropriate for a normally lit outdoor shot . If photographs are being taken in bright sunny conditions, where there is excessive light, a faster speed, such as 1/500 , may be needed. This prevents too much light entering the camera and overexposing the film. Alternatively, a smaller aperture could be used which may also prevent excessive light entering the camera
If it is overcast or late in the afternoon, a slower speed, such as 1/60th , may be needed to ensure that enough light reaches the film. It is always desirable to look at the light meter to guarantee the correct exposure
The aperture also has a direct bearing on the amount of light that enters the camera, so it is very important that the shutter speed and aperture work together in order to create a correctly exposed photograph
A shutter speed slower than 1/30th of a second should, as a general rule, only be used in conjunction with a tripod. This is because the film will generally record the effect of camera shakes caused by hand movements at slower speeds.
When using a flash it is important to set the shutter speed on the appropriate setting. This is generally -1/60th and/or is indicated by a star or lightning bolt next to the shutter speed number on the dial
Shutter speed controlling movement
The shutter speed controls the exact amount of time that a subject is exposed to the film. Photographers generally have a choice about how they wish to capture a moving subject —in frozen motion, blurred motion, or frozen subject with blurred background. If the subject is moving it is important to select the appropriate shutter speed to capture the image. If the subject is moving quickly, a fast speed (1/500 or 1/1000) can be used to capture the image frozen in motion.
Alternatively, a slow speed can be selected so the image moves through the frame to create a blurred picture.
frozen motion: By using a very fast shutter speed (1/1000 or 1/500th of a second) the camera can capture a fast-moving subject and freeze it The shutter will work so quickly that the subject will barely move while the shutter opens and shuts. Frozen morion photographs are normally taken of images in midair (a high jumper going over the bar) or to record a split second of an event (the close finish of a race or a swimmer in mid-stroke).
Blurred motion: By using a slower shutter speed (1/30) and a tripod, a camera can create the illusion of movement by capturing a sharp background and a blurred moving subject (see figure 1.3C). The tripod will hold the background still as the shutter opens and the moving subject is captured before it closes again. Blurred motion photographs are often used to create the illusion of speed (a racing bike) or movement (a hand waving). Sometimes photographers use this technique at night to record a city scene with car lights moving through it
At night, with limited light, the camera can be set on shutter speed B. A tripod can be used to prevent camera movement and the image exposed to the film for approximately five seconds by keeping a finger on the shutter release. This creates very interesting and creative effect.
frozen subject with blurred surround; By selecting a slow shutter speed (1/30 or 1/60th) and panning (moving) the camera with the moving subject, the photographer can capture a frozen subject with what can appear to be a moving (blurred) background. BY moving the the subject and allowing the shutter to open and shut slowly while the camera is moving, the film will freeze the moving subject and the background image will be blurred These types of photographs are often taken to create the illusion of movement and, in particular, speed (for example, a racing car driving past with a blurred crowd in the background),
APERTURE
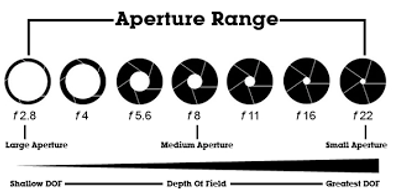
The aperture is a small hole in the lens through which light travels into the camera and onto the film. The size of the hole can be altered by naming a narrow ring on the lens, which controls the amount of light that enters the camera and the depth of focus in your photograph (see figure 1.4A). The hole size is indicated by what is known as an f-stop number. These numbers indicate a fraction of the hole's size in relation to the focal length of the lens. Some or all of the following f-stop numbers may appear on the aperture: 2, 2.8, 4, 5-6, 8,11,16 to 22 (see figures 1.4B and 1.4C). Each" f-stop number allows half as much light as the f-stop number before it. For example, f.4 allows half as much light to enter the camera as f.2.8. Alternatively, f.2.8 allows twice as much light to enter the camera as f.4. Note that the larger the f-stop number is, the smaller the hole in the lens.
What aperture to use
To manually adjust the aperture use either the A or M mode
A standard aperture to use is around f.8 or f.ll. This should, give a reasonable depth of field and an adequate shutter speed ( js 1/125 or 1/250th) under normal outdoor lighting conditions using 125 ASA film.
Controlling focus — depth of field
The size of the aperture has a direct effect on the distance of focus within a photograph- This zone of focus is commonly called the depth of field. In most cases, by selecting the appropriate aperture, a totally focused shot should be achieved; that is, everything in the photograph should be dear and sharp. This is called a large depth of field. Selecting another aperture enables you to choose to have only a small part of the photograph in focus; that is, only the main subject is clear and sharp, with everything in front and/or behind it out of focus. This is called a small depth of field.
Think of depth of field as selective focusing. By understanding its possibilities you will have another tool at your disposal for creating interesting and imaginative photographs.
Controlling the zone of focus. The easiest way to understand how to control the zone of focus in a photograph is to remember the following:
large f-stop number (for example, f.22) = large
depth of field • small f-stop number (for example, f.4) = small depth of field.
Depth of field scale. A variety of levels of focus are at your fingertips. Every f-stop number will give you a different depth of field.
FOCUS
The focus on a camera controls the clarity of the photographs that are taken. In order to have a clear, sharp image it is very important to understand how the focus works on the camera being used. As with most things in photography, there are many different kinds of systems. Photographers must have a thorough understanding of a camera's focusing system and how it works to gain the best results.
Most old basic cameras have a fixed position lens and don't allow any control over focusing. These cameras have been designed so everything from two metres onwards is in focus, which makes them very easy to use. However, a sharp image cannot be achieved with a close-up of less than two metres.
If you are using a camera with adjustable focusing, you will find it has some kind of scale to allow choice over the appropriate setting. Simple cameras tend to use basic symbols, or may require you to gauge the distance the subject is from the lens by adjusting the focus ring accordingly
Advanced cameras have a built-in focusing system. A focusing dial on the lens of these cameras needs to be manoeuvred in order to achieve a sharp image.
Some SLR cameras also have what is known as a split system where a small dissected circle appears on the screen when the lens is looked through To achieve correct focusing, the focusing dial needs to be moved around until the image comes together within the circle (figure Another system shows a central grid of miniature crystals on the screen The crystals shimmer and appear unclear when the shot is out of focus. In order to achieve correct focus, the focus ring needs lo be moved until the crystals appear dear and sharp
Automatic focusing
Set the camera lens to A for auto focus or M to manually focus
Many modem cameras are built with automatic focusing systems that make it very easy to attain a clear, sharp image. However, they do have their drawbacks and must be used correctly.
Automatic focusing systems are generally structured so that when a ringer is placed on the shutter release the camera will automatically focus on what is in the centre of the frame. This is because the camera assumes that the major subject of the photograph will appear in the centre. A problem can occur if the photographer wants to be creative and does not have die major subject exactly in the middle of the screen or frame (see figure 1.2F). If the shutter release is pushed halfway down before the user has finished framing the shot, the camera will automatically focus on whatever is in the centre of the frame. If the position of the shot is changed after this to a subject closer or further away while the shutter release is still partially depressed, it wil] result in the latter subject being out of focus while the original subject remains in focus. This technique is commonly used if the subject of interest is not required in the centre of the picture.


Using the camera simulator - click on the manual setting
Explore different settings -firstly adjust the ISO to 100
Ensure the light is set to sunny outdoors
Speed
Now experiment with different settings
change the shutter to a fast speed - 1/1000 sec keeping the aperture on f8 - what difference do you notice - why has this occurred?
select the correct settings to freeze the motion of the spinning wheel toy the girl is holding - yet ensure the light is exposed correctly
Light
Try a slow shutter speed - of 1/15 sec - what happens to the toy now ? what should you adjust to ensure the exposure is clear ? -
Depth of field
Adjust the aperture to achieve a large depth of field within the image ( full area of focus in the image)
How do you need to adjust the aperture to make up for the limited light allowed into the camera ?